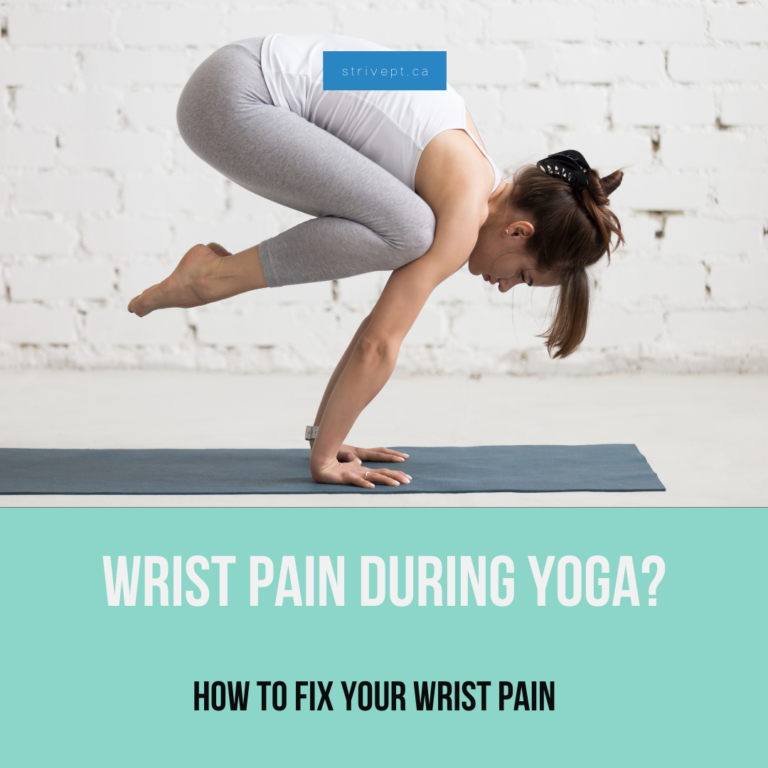
For anyone who has tried to do a yoga class and has found their wrists to be their weakest point, this blog is for you!
I will teach you how to work your way into more weight-bearing on your hands and wrists in a comfortable way.
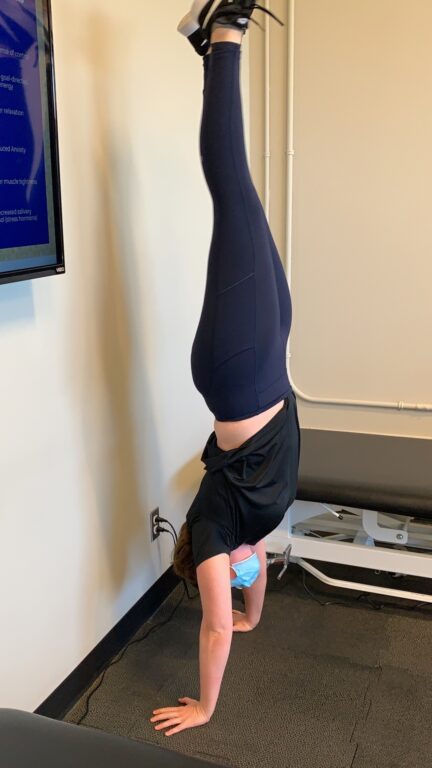
I used to struggle with a full yoga class because there was just SO MUCH weight-bearing through your hands and wrists, and my wrists were not used to that. So when I made a goal last year to train myself to be able to do a handstand, my biggest concern was not my core strength, or my shoulder strength, or my sense of balance when upside down… my biggest challenge was going to be “Will my wrists still be in one piece if I start this training?”
1 year later, and a somewhat impressive (if I do say so myself) 3 second freestanding handstand later, and my wrists are stronger than ever and haven’t been a concern of mine in months.
To start, what is weight-bearing on your hands?
Weight-bearing is supporting the weight of your body through your limbs. Classically our legs are our weight bearing limbs when we stand or walk around. Weight-bearing through hands for most people will involve partial weight bearing through feet and hands, unless you’re getting into handstands or other inversion positions where JUST your hands are on the floor. Most people will weight-bear through their palms spread, and palms pressing into the ground. Spread your fingers out for the biggest base of support, to improve your balance.
Why do my wrists hurt during yoga?
How is everyone else doing it?!
If you think of a baby learning to move around and crawl, they use all 4 limbs to weight-bear. One of the early motor milestones is using their hands or elbows to lift their head and shoulder off of the floor (“cobra” in yoga). Babies crawl around on their hands and knees all day, getting into “down dog” positions without even knowing what yoga is. In play time, kids will often spend a lot of time on the floor in different positions, including on their hands. But when is the last time YOU crawled around on your hands and knees for prolonged periods of time, on a regular basis? Over time, we can lose our ease of doing this because we don’t practice this skill often.
Those people in yoga classes breezing through poses like they’re nothing probably have the benefit of a ton of practice time to let their hands and wrist get used to that much weight-bearing!
How can I stop my wrist from hurting when I do yoga?
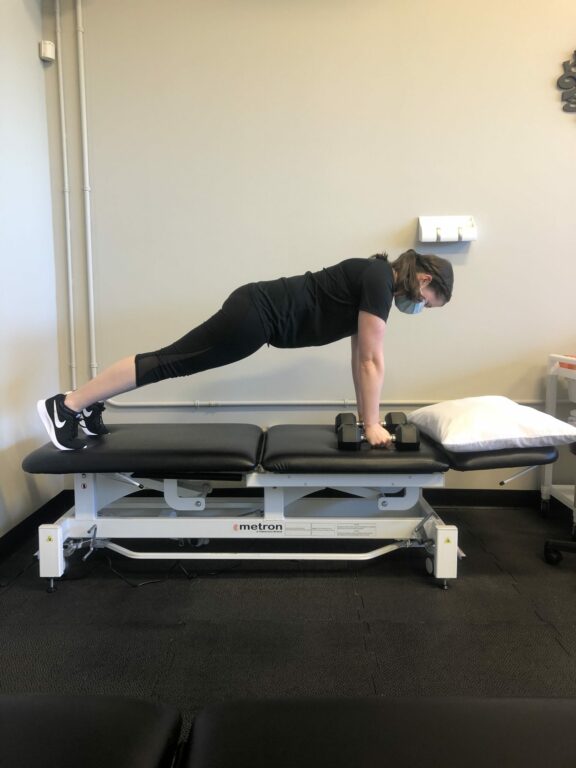
If your wrists are too sensitive but you would like to do some weight-bearing activities, you can use a dumbbell to grip onto and weight-bear through the dumbbell. This can be particularly helpful as a modification if you’re trying to do pushups but can’t manage full weight-bearing through the palms. Weight bearing through the back of your hands is NOT recommended (ouch!).
I have wrist/hand pain already on an everyday basis with work/my sport. Should I start practicing weight bearing on my hands?
Because there can be many different causes of wrist pain/or other symptoms, I recommend seeking out a physiotherapist to help you assess and treat your particular condition, and help get you to the point where you can start practicing more hand weight-bearing on your own.
How do I know where to start?
In order to know if you’re ready to start weight-bearing through your hands on the floor, we can do a few tests that get progressively more challenging. Move your way from Step #1 to #5 to see what your starting point is!
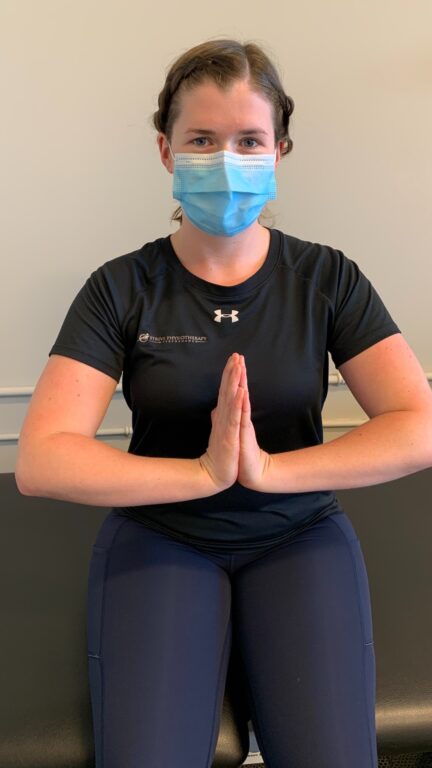
- Can you put your palms together over your chest with your fingers pointing away from you without pain?
This tests your wrist flexibility – this should make a 90 degree angle with both of your wrists and test your wrist flexibility with a minimal amount of pressure. If you can do this, move to step number 2!
If you can’t get your palms together, or your wrists don’t bend back to 90 degrees, you can practice this stretch first for 3 repetitions of 30 seconds / day. If this feels painful, you may want to do shorter, less aggressive stretches that don’t push into the pain. Try 10 repetitions of 2 seconds holds, 3 times per day). Once you can get your palms together comfortably, move onto step number 2!
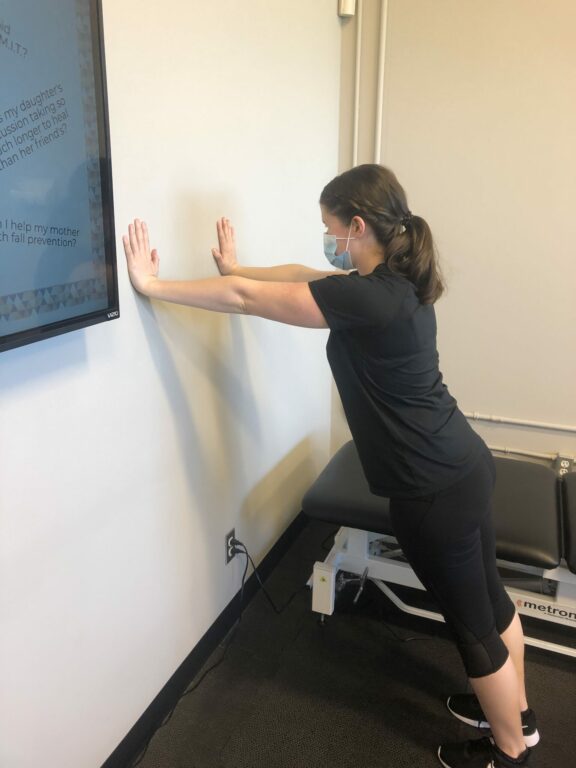
- Can you place your palms flat against a wall at shoulder height comfortably?
Start with your feet ~ 1m away from a wall, with your body facing the wall. Place your palms on the wall at shoulder height, with your fingers facing up towards the ceiling. Hold this position for 30 seconds. If you can do this, move to step number 3!
If this feels challenging or painful, you can either move back to step 1, OR you can try raising your palms a bit ABOVE shoulder height. This will decrease the angle of wrist extension and make it easier to weight-bear through your hands on the wall. Hold for 3 sets of 30 seconds (or for as long as you can comfortably!) on a daily basis, and then move your palms down progressively back down to shoulder height until you can hold for 30 seconds.
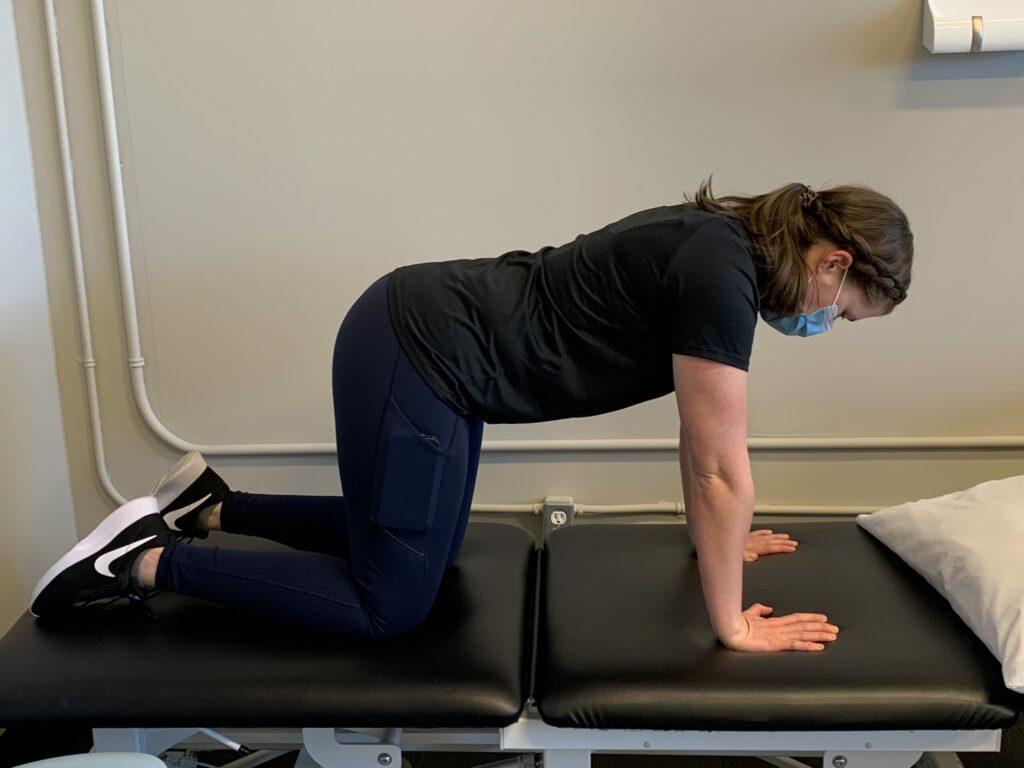
- Can you position yourself in a hands and knees position, with palms directly beneath your shoulders?
Now we are starting to hold more of our body weight up with our hands. Line up your knees to be directly below your hips, with your palms directly below your shoulders. If you can hold this position comfortably for 30 seconds, move on to step 4!
If this feels challenging or painful, you can either move back to step 2, OR you can try moving your hands forward slightly. While this may be more challenging for your shoulders, this will decrease the angle of wrist extension and make it easier to weight-bear through your hands. Hold for 3 sets of 30 seconds (or for as long as you can comfortably!) on a daily basis, and then move your palms down progressively back down to underneath your shoulders until you can hold for 30 seconds.
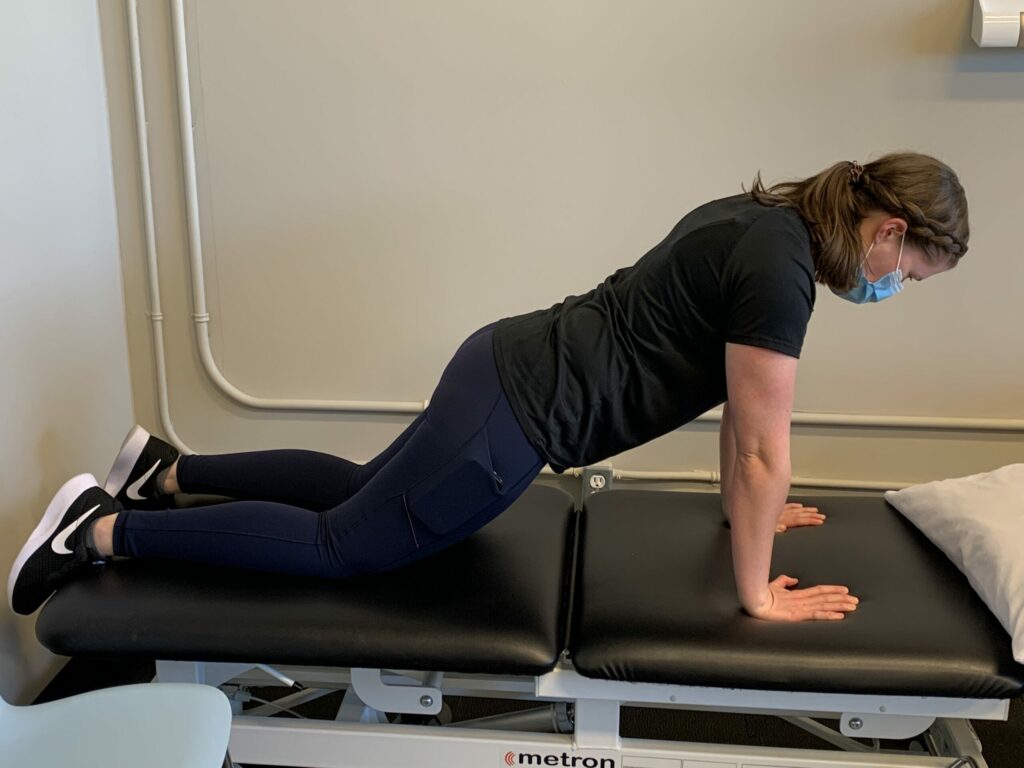
- Can you do a plank from knees position with your palms directly beneath your shoulders?
A great option to test your wrist strength and flexibility prior to a full plank is a knee plank, because it takes a little bit less of your body weight through your hands and wrists. Place your knees on the ground with your palms placed on the floor. Your elbow will be straight, and your head to your knees will be a straight line. I suggest lifting your feet up for comfort, but feel free to put a pillow under your knees as well for less pressure on your knees! Your palms should be directly below your shoulders. If you can hold this position comfortably for 30 seconds, move on to step 4!
Same as the last step – if you can’t do this, go back to the previous step OR try moving your palms forward slightly for 3 sets of 30 seconds daily.
If this feels challenging or painful, you can either move back to step 2, OR you can try moving your hands forward slightly. While this may be more challenging for your shoulders, this will decrease the angle of wrist extension and make it easier to weight-bear through your hands. Hold for 3 sets of 30 seconds (or for as long as you can comfortably!) on a daily basis, and then move your palms down progressively back down to underneath your shoulders until you can hold for 30 seconds.
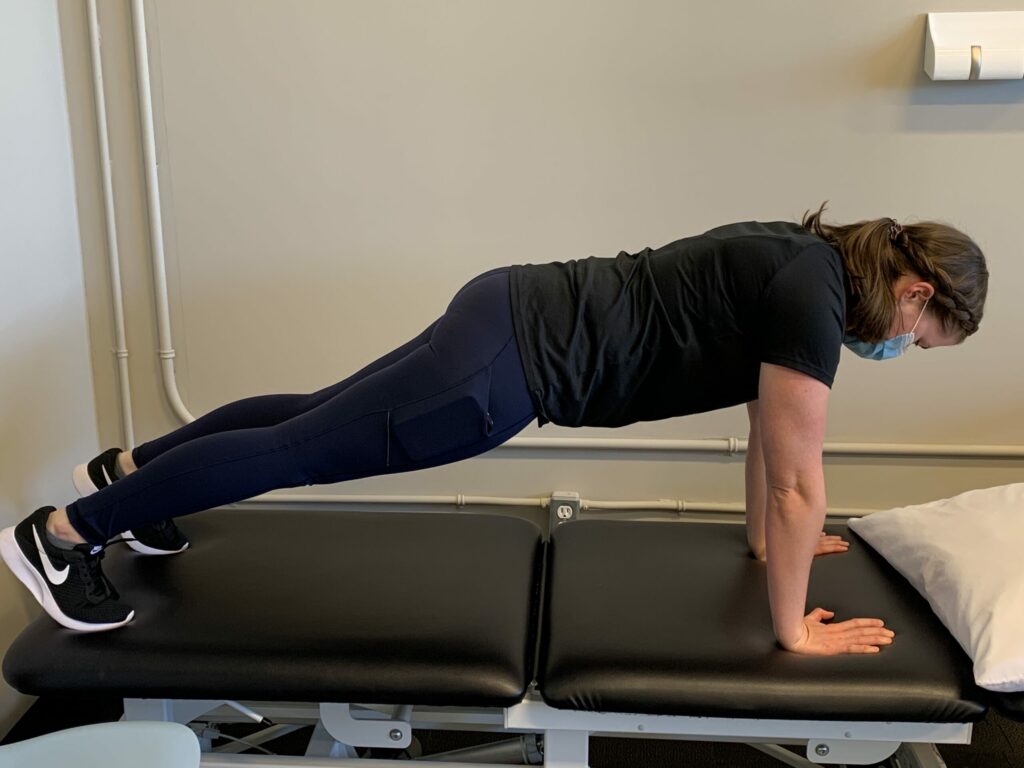
- Can you do a plank from your toes with your palms directly beneath your shoulders?
Keeping your body straight from head to heels (like a board or “plank”!), position yourself with your palms facing the ground beneath your shoulders. Your toes will be tucked under to hold the rest of your body weight up. Can you hold this for 30 seconds?
If you can’t, this is a great time to make use of a down-dog pose, which will decrease the wrist extension while you’re weight-bearing through your hands. You can take this opportunity to practice transitioning from plank to down dog, and back again – holding each pose for as long as you can comfortably and pausing to take rest breaks as needed.
From here, you can transition into many other types of weight bearing exercises ie. mountain climbers, burpees, or even handstands if you’re ambitious! The most important thing will be loading your wrists appropriately – that’s what’s coming up next!
Let’s talk about pacing.
When we think about “pacing yourself” you might think of taking it easy in a long race, instead of trying to sprint the whole time and then getting really tired and having to stop. The same “pacing” strategy can be used for many different other activities as well. In our context, we want to pace ourselves in terms of the intensity, frequency, and duration of our weight-bearing practice sessions.
If we practice weight-bearing too often, we might apply too much repetitive pressure cumulatively and our wrists may start to feel sore.
If we practice weight-bearing for too long in one go, we might feel sore after that practice session and not be able to do our next practice session.
If we practice weight-bearing at a level that is too challenging for us, we might start getting sore from doing too much too soon.
However, this doesn’t mean that our abilities can’t change! That’s why we practice – over time, our abilities will increase and we will be able to do harder and harder activities. Just because you can’t do something right now, doesn’t mean that you can’t do it in the future.
If you’re able to complete step 5 above (planking for 30 seconds), you’re ready to continue to progress into harder levels of weight bearing. Maybe you will continue into a few minutes per day of planks, or maybe you will try some plank variations, like burpees, pushups, or mountain climbers.
I would suggest starting at a few minutes on a daily basis, with multiple breaks as needed within each session. If you start getting sore, take an extra rest day, or back off on the length of your session. Add on a few minutes to your session week – week if you are feeling like your activities are easy. It may take you weeks, or months, or maybe even years to progress to the level you want – everyone and everyBODY is at a different starting point. Take where you currently are, and improve from there. Methodically increase the amount of weight-bearing time you are doing on your hands, until you are able to achieve your hand weight-bearing goal.
This is how I trained myself to do a handstand – by doing 3 rounds of wall handstands (for as long as I could) per day with my feet on a wall for safety, which built up my wrist, shoulder, and core strength, until eventually I was able to kick up into a handstand without wall assistance.
Obligatory handstand picture!
Wait, this all sounds pretty easy, I can already do a bunch of planks/yoga/weight-bearing activities, it just feels sore after I do too much!
Amazing! You probably already have an idea of what your tolerance level is, and now you simply have to respect your abilities and build from there. Evaluate how much weight-bearing through hands activities you’re doing in a week. How many times/week are you practicing? For how many minutes? What type of weight-bearing is it (ie. pushups, a 45 min yoga class, etc)? If you’re handling it really well, then great! Try to add in a few more minutes of a more challenging weight-bearing position to challenge yourself.
If it’s not going well, then you may need to back off to a challenge level that is pain free, and then methodically add in harder and harder challenges. Simply being consistent with a 30 mins yoga class a few times per week may be more beneficial in improving your skills than doing a 60 mins yoga class once a month, with your wrists feeling sore after.
What else can I do to help strengthen my wrists?
While weight-bearing will help strengthen your wrists, some people can benefit from a little bit of extra help in supporting their wrist joints. You can do wrist specific strengthening – specifically wrist extension curls and wrist flexion curls with a small dumbbell.
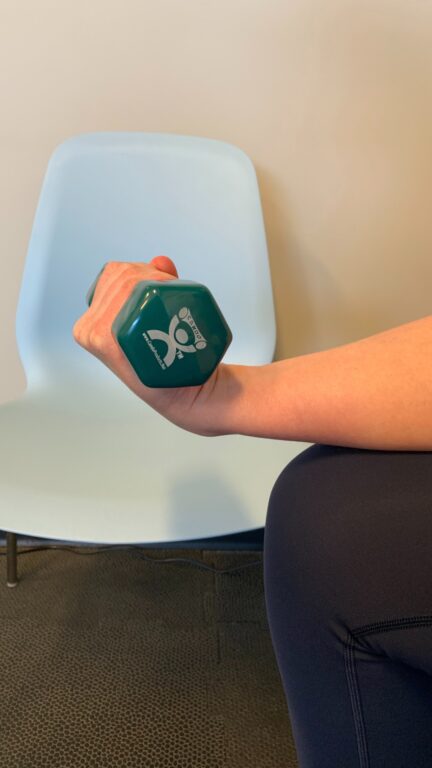
Wrist flexion curl:
Start with your forearm supported and a small dumbbell in your palm (palm facing up). Bring the dumbbell up as far as you can by bending your wrist up, and then slowly relax the dumbbell down as far as you can. Choose a weight that feels comfortable to do 8-15 repetitions. 2-3 lbs may be a helpful place to start for the average person, but if you do a lot of weight lifting, you may be able to do 5-15lbs.
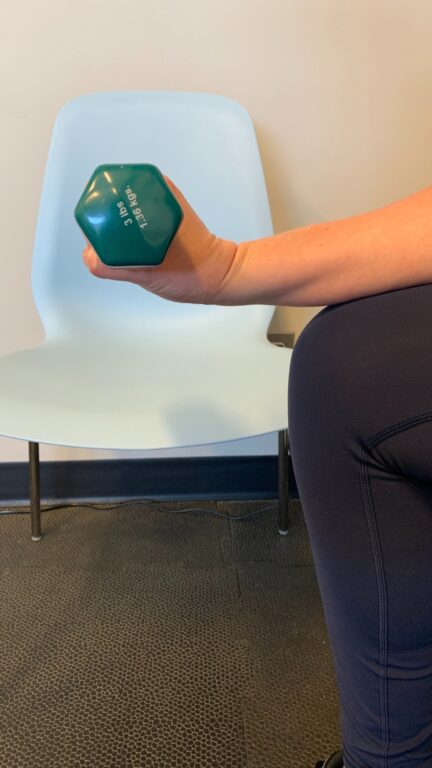
Wrist extension curl:
Start with your forearm supported and a small dumbbell in your palm (palm facing down). Bring the dumbbell up as far as you can by bending your wrist up, and then slowly relax the dumbbell down as far as you can. Choose a weight that feels comfortable to do 8-15 repetitions. 1-3 lbs may be a helpful place to start for the average person, but if you do a lot of weight lifting, you may be able to do 5-10lbs.
You also may find that your wrists get stronger with other strengthening exercises. For example, your forearm and wrist muscles have to contract to hold a dumbbell to be able to do a bicep curl. Try to keep your wrist in a neutral position, meaning that your wrist is not bent forward or pulled back. This can be hard to do well when you are using heavy dumbbells and not paying attention to your wrist position, so use a mirror while you are strength training to check your wrist position. If you do a lot of physical labour as part of work, you may find that your wrists are already quite strong!
Are your wrists giving you more trouble than a blog can help with? Call us at 519-895-2020, or use our online booking tool on www.strivept.ca to book an appointment with one of our knowledgeable physiotherapists, and they will be sure to help you understand your wrist abilities better, and help to achieve your goals!
Cheers,
Amanda McFadden
Physiotherapist at Strive Physiotherapy and Performance