
A less common direction of dislocation is posteriorly – this is as a result of flexion, internal rotation, and adduction in addition to a posterior force to your arm (think falling on to the ground hands first.
Your shoulder can also “partially dislocate”, or sublux.
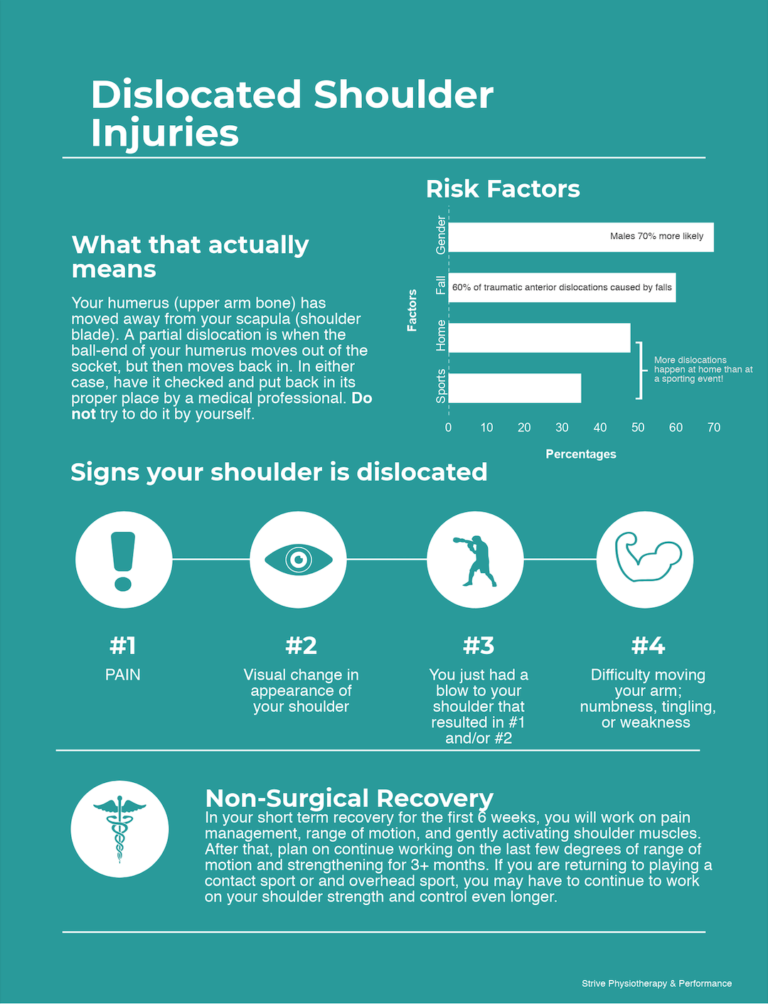
This can happen if your humeral head moves out of the socket, but then moves back in. If this happens, you may still require treatment, similar to as if you had fully dislocated it. It can cause similar complications and limitations.
How to tell if you dislocated your shoulder
-
It’s going to hurt!
-
You may notice a difference in the shape of your shoulder – the edge of your shoulder may dip down lower than usual.
-
You likely just incurred a blow or trauma to your shoulder that resulted in 1&2
-
It is going to be difficult and painful to move your arm. You may have other signs and symptoms including numbness, pins and needles, tingling, and weakness throughout your arm.
Symptoms after you have dislocated shoulder
After the dislocation is reduced (put back in place), the intense pain will subside but some mild pain will remain.
Your shoulder also will be stiff and lack its usual amount of movement. You likely will experience weakness in your shoulder muscles and find activities around the house more difficult.
Complications from a shoulder dislocation
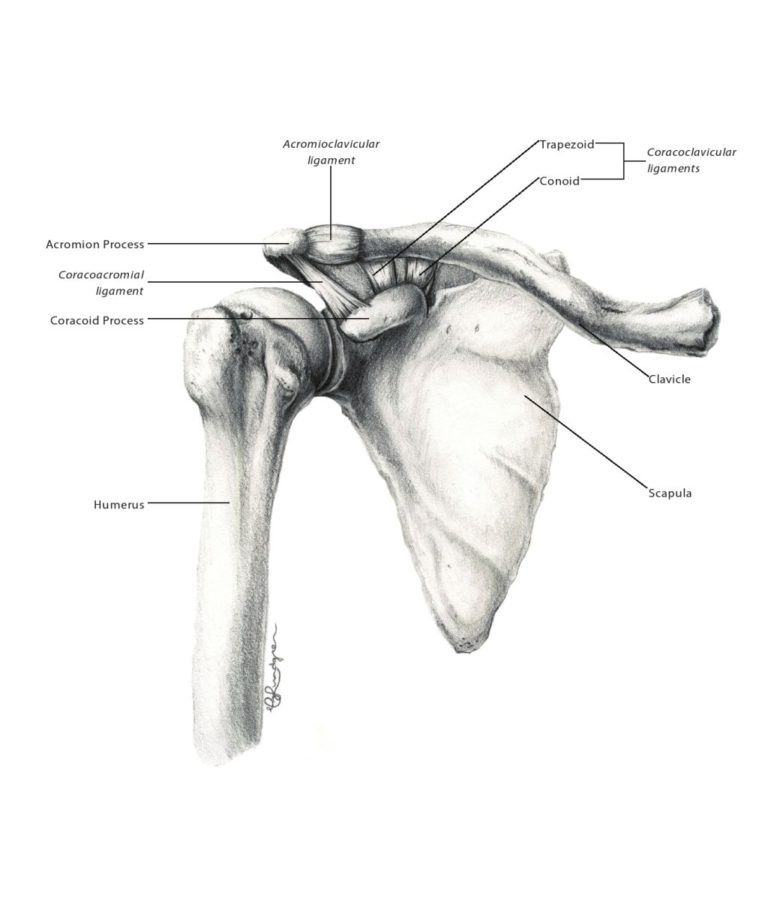
When your shoulder dislocates, the humerus moves out of its usual spot in a forceful manner.
Because of the change of the position of the bones and the force that’s required to make this happen, injury can happen to a number of the structures in the area including the labrum (which creates a “Bankart Lesion” when it’s anteriorly), the nerves in the area, the muscles in the area, and sometimes even the bone (a “Hill Sachs lesion” when it’s the head of the humerus that is affected).
These additional injuries to structures around your shoulder may require modifications to your treatment plan.
For example, a nerve injury can result in pin and needles, tingling or numbness sensations, but can also result in muscle weakness in different muscles throughout your arm.
Unfortunately, the likelihood of having another dislocation after a first time traumatic dislocation is pretty high – one meta-analysis has found that the recurrence rate at just 1 year post-injury is 39% when considering both medically managed and self managed dislocations.
(Some studies that look at client’s with shoulder dislocations seeking medical management have an even higher rate of recurrence, depending on your risk factors!).
Factors that increase your risk of recurrence include if you :
-
Are younger (especially <20 years old)
-
Male
-
Have hyperlaxity (ligaments are looser)
-
Have dislocated recently
Conservative (non-surgical!) treatment for a dislocated shoulder
In your short term recovery for the first 6 weeks, you will work on pain management, range of motion, and gently activating shoulder muscles.
After that, plan on continue working on the last few degrees of range of motion and strengthening for 3+ months.
If you are returning to playing a contact sport or and overhead sport, you may have to continue to work on your shoulder strength and control even longer.
Pain management
After a shoulder has been relocated, treatment may involve a sling for a short period of time to help ease the discomfort immediately following the relocation.
After relocation, the level of pain will often come down significantly.
After a few days you may notice that your muscles in your shoulder get tighter and can feel uncomfortable.
You can use a heating pad on your shoulder to help ease any discomfort and to help you do your exercises more effectively.
Gentle massage therapy can also be helpful for tight and sore muscles throughout your recovery process.
What to Avoid
Avoid your usual sports (especially overhead sports – baseball, volleyball, tennis etc) and heavy lifting until your shoulder strength returns.
You will also want to avoid reproducing your method of injury (the position you were in when your injury happened).
The good news is that your body will usually remind you if you’re getting close to that position – it won’t feel comfortable.
ROM
After a shoulder dislocation, your muscles will tighten up in order to help protect the area.
This means your range of motion will be less and you will feel stiff, with some end range pain.
In order to regain full range of motion of your shoulder, you will begin “active assisted range of motion” (AAROM) exercises for your shoulder.
This means that you will use something else to help your arm move so it’s not just your muscles doing all of the work.
This is helpful to decrease the pain that you experience as you work on increasing your shoulder range of motion.
Don’t push through pain! Your shoulder is still recovering so we want to focus on gentle motion in the area that is relatively pain free. As you continue to work on these exercises, you will find that your range of motion will continue to increase. Here are some sample exercises that you may start with for range of motion.
1. Pendulums
This is a great exercise to help ease pain by moving the shoulder joint in a gentle way. You can use these as needed for pain relief.
Start by swinging your arm by shifting your body weight in a circle for 30 seconds.
The key to this exercise is RELAXING your shoulder completely in order to let the movement happen comfortably, without your shoulder muscles trying to prevent it.
This can be performed 10x/day to help with pain management.
2. Abduction with a broomstick
By grasping a broomstick in your hands, use the opposite hand to push the affected arm up and to the side slowly. Return back to the starting position slowly. Perform 10x, three times per day.
3. Flexion with a counter
Bring your hand to rest on a countertop, while you are facing the counter. Slowly back your feet up as you let your shoulder come up towards your ears. Return slowly back to the starting position. Perform 10x, three times per day.

4. External rotation
Grasp a broomstick in your hands with your affected hand on the end. Use your unaffected side to push the broomstick gently out to the side, but keeping your affected side’s elbow in. Return back to the starting position. Perform 10x, three times per day.

Strength
You can create gentle muscle contraction by pushing your arm into a wall or door frame.
When you’re not moving your shoulder but you have muscle contraction, that’s called an “isometric exercises”.
Here are three examples to start activating your shoulder muscles, including your rotator cuff muscles.
You can start with 5 repetitions and holding for 5 seconds each.
1. Isometric Abduction – push the outside of your elbow into the wall

2. Isometric Internal Rotation – Start with your elbow bent to 90 degrees at your side with your thumb pointing to the ceiling. Push the palm side of your hand into a door frame.
3. Isometric External Rotation – Start with your elbow bent to 90 degrees at your side with your thumb pointing to the ceiling.
Push the backside of your hand into the wall.
This is the same as the video above, but with the opposite side of your hand.
Proprioception
Proprioception is a fancy word for your brain’s awareness of where your body is in space.
Here’s one way to start working on it.
Shoulder Alphabets
Lie on your back with your arm pointed straight up at the ceiling. Move your whole arm in order to “write” out in the air different words.
The alphabet, the name of your favourite tv show, or the first 3 items on your bucket list are all good places to start. Spend about 60 seconds at a time working on this.
Long term recovery (6 weeks-3 months)
Everyone will progress at a slightly different pace. If you are still having difficulty with pain and range of motion, you may focus on less intense exercises for longer.
If your strength and range of motion has returned quickly, you may be able to progress to more difficult exercises quicker.
Range of Motion
At this point in your recovery, your range of motion should be nearing full. Continue to work on it daily for directions that are not yet equal to your other side.
Strengthening
At this point in your recovery, you can be using bands or weights to strengthen your shoulder muscles throughout their range of motion.
Later in your recovery, you can work more on strengthening overhead and in diagonals across your body to strengthen your shoulder in all areas of its range of motion.
Proprioception and shoulder muscle control
As you continue to progress, you can use controlled perturbations to allow your shoulder the experience of reacting to (somewhat) unexpected forces.
For example, you can hold your arm overhead and have a trusted helper apply perturbations to your arm (push you around) while you try to hold your shoulder in place.
(Make sure to start with little pushes before doing big pushes!) Check out the video below!

Surgical treatment for shoulder dislocations
Some shoulder dislocations may result in surgery. This is more likely when it is a traumatic injury and in younger individuals planning on returning to overhead or contact sports.
One example is a Bankart repair, which is a procedure where the surgeon will repair the labrum and the joint capsule to help prevent recurring instability.
Just because you had surgery, doesn’t mean that you’re off to the races the next day.
While the surgery can help stabilize the passive structures in your shoulder, it is also a trauma to your body and will require its own recovery.
You can expect that you will experience range of motion limitations and strength limitations that you will need to work to improve.
Your surgeon may give you specific restrictions in terms of what movements you can and can’t do, and for what time period.
Each surgeon and surgery is a little different, so make sure you respect these limitations to allow the surgical area to recover.
Conclusion:
Does it seem like there’s a lot of areas to consider in your recovery process?
There is!
I recommend seeking out a physiotherapist to help guide you through conservative treatment.
The most important point to remember is to continue working on exercises until your shoulder range of motion is full and your strength has recovered at least equal to the otherside (if not more!).
Have you had a shoulder dislocation in the past that is giving you problems?
Call us at 519-895-2020 to discuss your situation!
Or you can use our online booking tool on www.strivept.ca to book an appointment with one of our knowledgeable physiotherapists, and they will be sure to help you understand your condition and get you moving again.
Cheers,
Amanda McFadden Physiotherapist at Strive Physiotherapy and Performance