Have you ever felt that annoying pain in the front of your knee that just doesn’t seem to go away? Before attending physiotherapy school, I suffered from jumper’s knee for years – despite not participating in any jumping activities! It wasn’t until I started learning about why I was experiencing pain that I finally started to take the appropriate steps to get better. Two years later, I am now completely pain-free!
I am going to show you exactly what I learned in order to become pain free, so you can get back to enjoying your life – without knee pain.
Let’s start out with some basic anatomy.
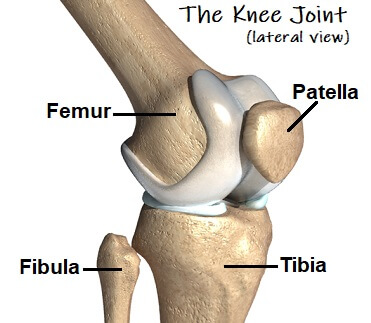
Your Knee
The knee is a hinge joint, which is comprised of 3 bones: the femur (thigh bone), the patella (knee cap), and the tibia (shin bone). In order for the knee to perform its main functions of bending and straightening, the patella must slide up and down in the groove of the femur.
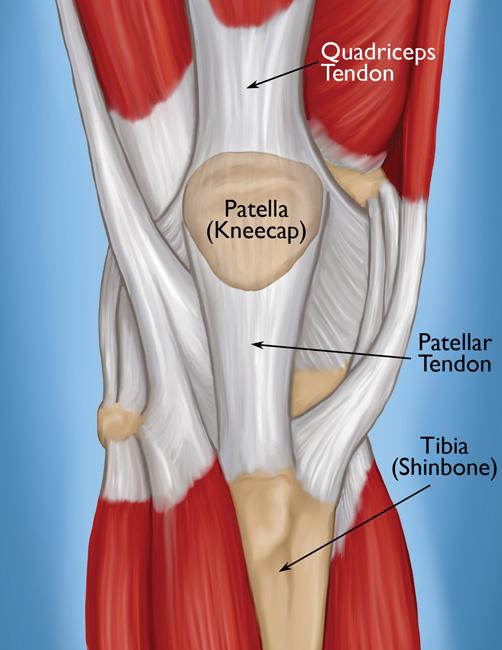
Your patella is able to move this way thanks to the quadriceps and tibia tendons attached to it.. As you can see in the image above, the quadriceps tendon connects the patella to the quadriceps (muscles on the front of your thigh), while the patellar tendon connects the patella to the tibia (your shin bone).
The term jumper’s knee usually refers to an injury to the patellar tendon, also termed patellar tendinopathy.
How Do I Know if I Have Jumper’s Knee?
It is important to note there are many other causes of knee pain, so I recommend seeing a sports injury physiotherapist in order to obtain an appropriate diagnosis and treatment plan.
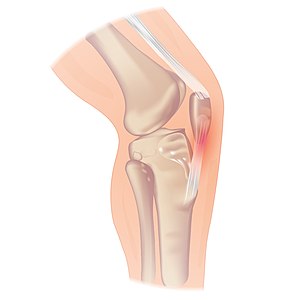
That being said, patellar tendinopathies are usually overuse injuries with a gradual onset of pain. For example, someone who is experiencing jumper’s knee may not remember a specific event where they injured their knee, but will likely have had an increase in activity that involves the knee, such as jumping. The pain is commonly located at the bottom of the patella, right where the patellar tendon connects to it, as seen in the image below:
Individuals with this injury will typically have pain with any activity that involves bending their knee. While this list is not exhaustive, the following activities may be aggravating for someone with jumper’s knee: jumping, squatting, lunging, running, climbing stairs, and prolonged sitting. This injury is also more common in athletes from 13-30 years old who engage in frequent jumping, such as basketball players and dancers.
What should I do if I am experiencing jumper’s knee?
Since jumper’s knee is usually an overuse injury, the first step to recovery should be activity modification.
When I had jumper’s knee, it was due to my increase in working out at the gym. I was doing heavy weighted squats about 3-4 times per week, which eventually led to me having knee pain with just walking!
For me, reducing the amount I was squatting from 3-4 times per week to 1 time per week was enough to significantly decrease my pain. That being said, it is important not to take this idea too far and avoid all activity. Load management is crucial to improving this injury, as well as other cases of tendinopathy.
Below is a visual representation of the importance of load management for tendons. Let’s go through it together:
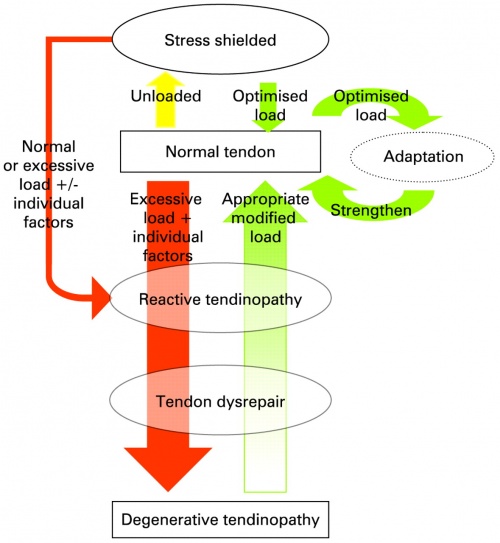
In order to remain healthy, tendons require some amount of ‘loading’. Loading is increasing the amount of work your muscle or tendon does. This means that your tendons need to move!
Looking at the image above, you will see the box that says normal tendon. Notice that to the right of this box, there is an arrow that says optimized load, which points to another box that says adaptation, followed by an arrow that says strengthen. When a tendon receives an optimal load (an ideal amount of work), it will adapt to that load, and become stronger.
Now look at the thick red arrow pointing downwards that says excessive load + individual factors. When tendons are given excessive load, they may progress through these states of tendon dysfunction. These specific states of the tendon can be determined through imaging, but don’t always correlate with pain.
This is why the individual factors are an important part of this concept, as some people with degenerative tendinopathies may not experience any pain; some people with only reactive tendinopathies may experience very high pain. As shown in the image, individuals that are anywhere along the tendinopathy continuum may return to having a normal tendon with appropriate loading. Wherever you may fall on that diagram, your tendon has the potential to return to normal!
Before we move on, take a look at the yellow arrow pointing up from the normal tendon that says unloaded. When tendons are not given any load (work), they become “stress shielded”. This means they are more susceptible to injury, as shown by the thin red arrow on the left that says normal or excessive load +/- individual factors.
For example, if an athlete who was doing heavy squats 3 times per week stopped squatting completely for 2 weeks, and then returned to squatting, they may injure their tendon after doing only one workout.
Why? Lack of loading, which could cause a normal tendon to become stressed, and then injured. Even if the movement is something you have done before!
Ultimately, optimized loading is a key component when it comes to rehabilitating tendon injuries.
How do I fix my Jumper’s Knee?
Optimal loading of a tendon is going to be different for each person depending on their individual factors, such as injury severity. It is important to see a physiotherapist in order to determine what optimal loading will look like for you. That being said, current research supports the use of isometric exercises initially to help reduce pain and begin loading.
Isometrics are exercises where your muscles contract but your body does not move, such as a plank, ball squeeze, or wall sit. The isometric exercise I personally used to help with my jumper’s knee was a wall sit, as pictured below:
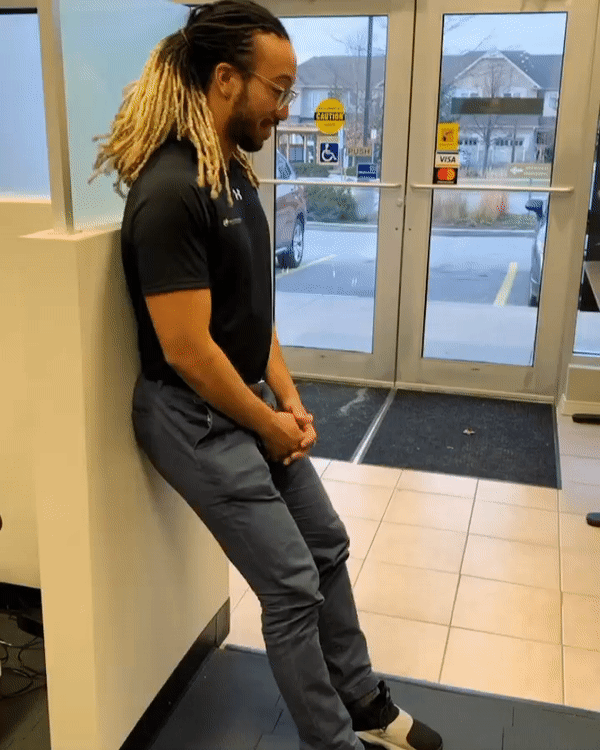
In a typical wall sit your knees form a 90 degree angle, but this will likely be painful if you are experiencing jumper’s knee. Sitting higher may be more comfortable. You should determine the depth of the wall sit based on your individual pain levels. While pain-free exercise is ideal, sometimes this is not possible.
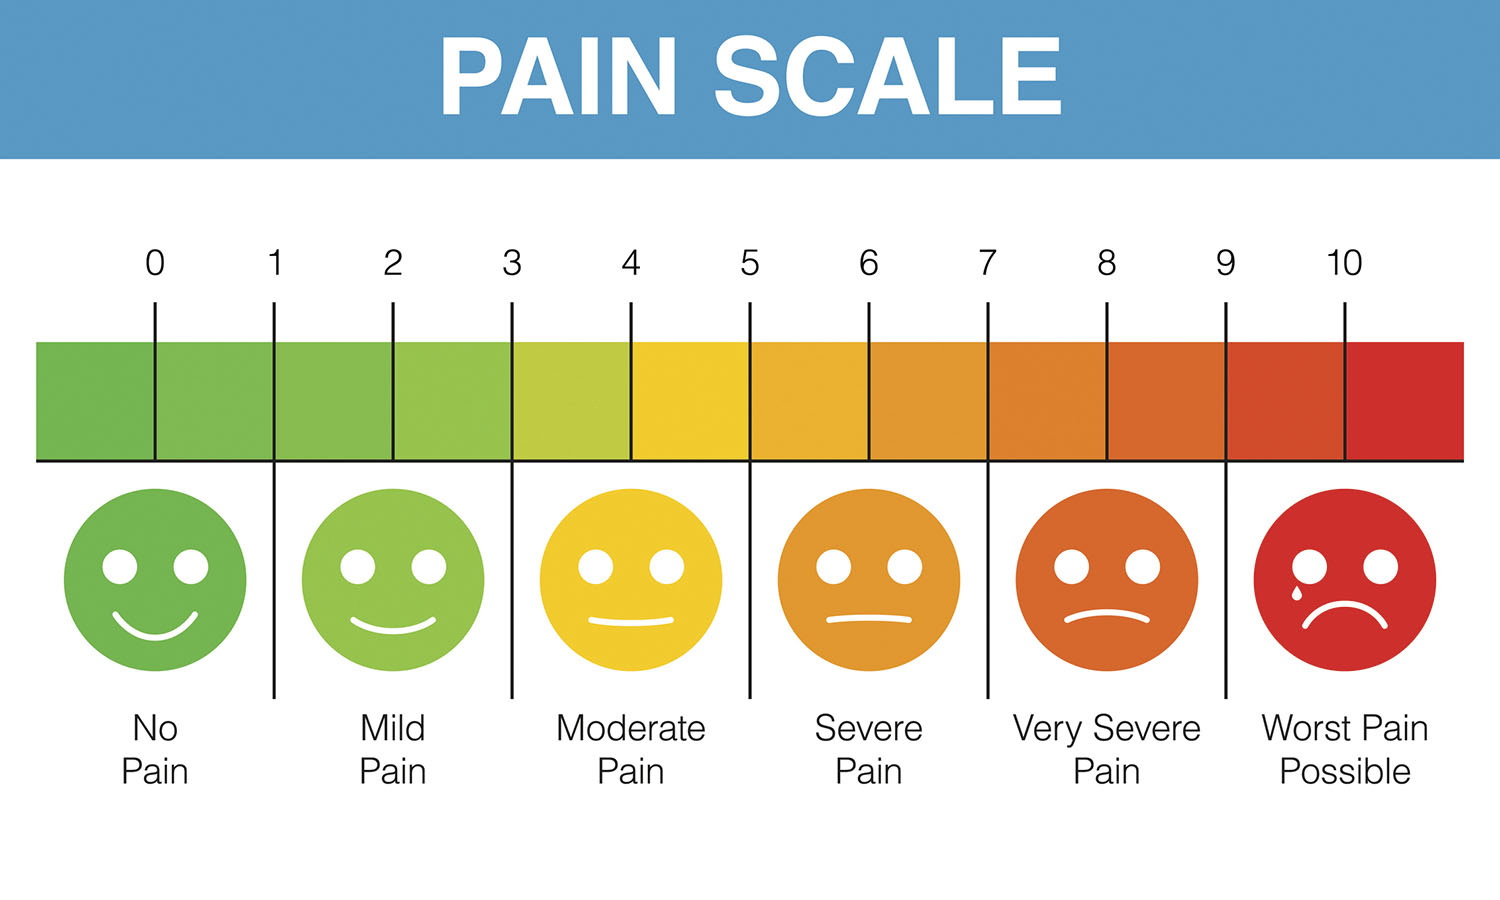
The scale below may be used as a guide for acceptable pain levels during exercise. Your pain should not exceed a 4/10 on the scale while exercising. If it does, the wall sit is either too low, or the exercise is too stressful for your injury at this time.
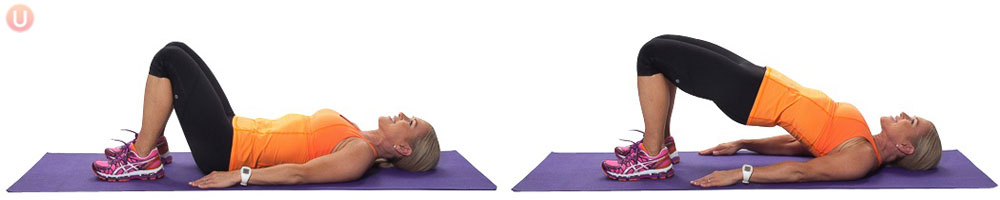
If the wall sit is too painful for your injury, another exercise option is a glute bridge as picture below.
After a wall sit became easy for me, I started doing isotonic exercises. These are exercises where your body moves as you contract your muscles, as opposed to before where our muscles worked but we didn’t have to move in order for it to contract The exercise I personally used was a box squat, as pictured below. Again it is important to respect your pain during this exercise. If your pain exceeds a 4/10, then either the box is too low, or you are not ready for this exercise at this time. Perform this exercise slowly, as quick movements place more stress on tendons.
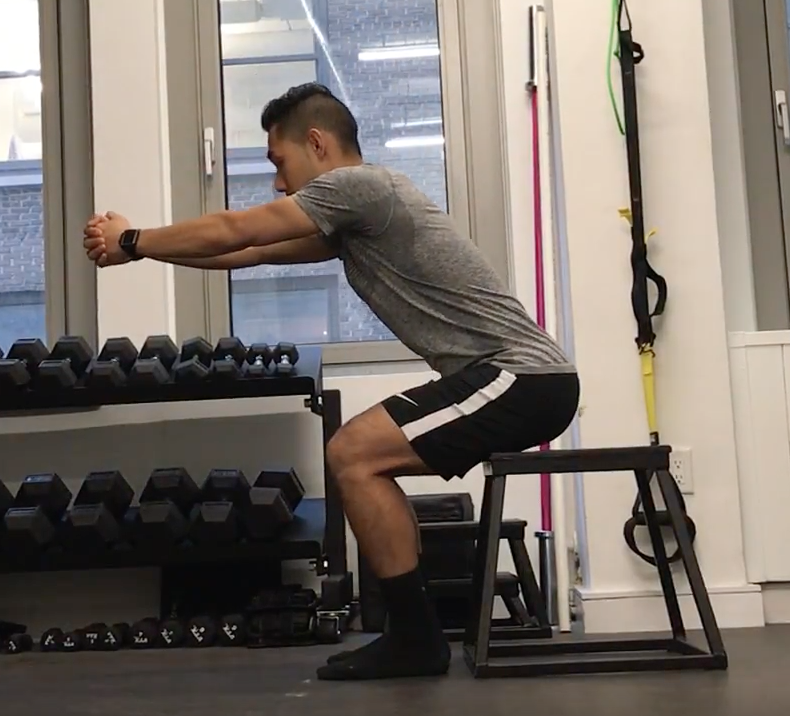
I personally progressed this exercise by adding weight and increasing the depth of my squat. Now, I am able to squat to my full depth with weight, and pain free!
Still not sure what to expect with your injury? Call us at 519-895-2020, or use our online booking tool on www.strivept.ca to book an appointment with one of our knowledgeable physiotherapists, and they will be sure to help you understand your injury.
Cheers,
Liam Newlands
Physiotherapy Resident at Strive Physiotherapy and Performance
Reference: https://www.sciencedirect.com/science/article/pii/S1836955314000915