Balance is a component of many rehabilitation programs, as it can be fundamental in minimizing falls risk, building motor control, and enhancing performance.
Many people understand that balance is important for leg injuries/conditions, but we promise it is so much more than that!
For a lot of us, how balance is even possible may seem like something that’s been pushed to one of those dark and dusty corners of your mind. Something about your inner ear, and the more feet on the floor the better.
Before we get into static and dynamic exercises plus balance progression programs, let’s dust off a couple of cobwebs.
According to the beloved Oxford Dictionary, balance is “an even distribution of weight enabling someone or something to remain upright and steady.” Most of us would agree that “staying upright and steady” is the ideal position when moving around, so let’s dig a little deeper.
How do Humans Balance?
Although many of us take our balance for granted, simply walking across uneven cobblestone involves a complex coordination of three main systems: sensory information from our eyes (vision), touch (proprioception), and inner ears (vestibular system).
Then, all of this collected information is quickly analyzed by our central nervous system (brain and spinal cord), and outputs back to our eyes and muscles, so that we can keep casually humming along.
When you read that, it can seem like balance is a LOT of work – which we will never really notice! The human body can be pretty cool, eh?
Breaking each of those systems down to their simplest form, let’s start with vision. Our eyes communicate with our brain/nervous system to perceive (and not perceive) the things in our environment extremely quickly and accurately.
Our vision system is a large part of what keeps us balanced! It warns our system of an upcoming balance threat (the uneven cobblestone) and prepares for it ahead of time. Don’t believe me? Close your eyes and walk around!
Proprioception is essentially our body’s unconscious awareness of where we are in space. We have many proprioception receptors (that respond to pressure and/or stretch) in our skin, muscles, and joints, all of which work together to notify our brain of our positional location in space.
To see this system in action, close your eyes and ask someone to move your arm around (out in front of you, or to your side).
Without opening your eyes, you’ll know where your arm was placed. Cool, right!?
Therefore, when you sustain an injury (for example, rolling your ankle), it is extremely common for your proprioception to be hampered.
As noted, our proprioception sensors are in our skin, muscles, and joints. So, for example, when suffering a rolled ankle, swelling causes your skin to stretch (altered proprioception in the skin), injury to your ligaments increases your joint laxity (altered proprioception in the joints), and your muscle is overstretched (altered proprioception in your muscles).
The “rolled ankle=decreased balance” example makes sense to most people, as our ankle/foot is in contact with the ground, and is understandably the first line of defence in maintaining our balance.
However, many other body parts are equally important. For instance, proprioceptive inputs from the neck indicate which direction the head (and therefore, eyes) are turned.

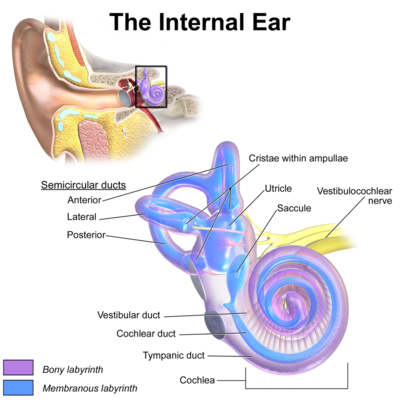
Your vestibular system is, quite frankly, a bit of a doozy.
In short, we have a very small set of inner ear bones (canals) that are filled with fluid (there’s a set in each ear). This fluid moves around inside the canals, which excites small ‘hair cells’. This excitation is transformed into electrical impulses that communicate with our brain.
Simple enough? Hang on.
To complicate things, there’s also a small collection of ‘otoliths’ (like little rocks), that rest on a gel pad (also inside our ears). As we move, the weight of the otoliths cause the gel pad to move, which also sends messages to the brain.
The fluid in the inner ear canals helps detect rotational movements, while the otoliths (little rocks) help detect vertical movements, as well as acceleration/deceleration of the head/body.
When our brain receives impulses from each ear that are symmetrical (agreeable information from both sides), all is well in balance land. It’s when there is a disruption of this symmetry that we have big issues. Stay tuned for a blog post on this topic alone!
Using an amazingly complex interaction of these systems, the human body walks around with seemingly very little effort. That said, because there’s lots involved, there’s plenty that could go wrong.
If our vision worsens (i.e. age-related changes, diabetes-related changes, infections, etc), we could have a balance deficit. If our proprioception system gets injured (i.e. muscle or joint injury, age-related muscle loss), we could have a balance deficit.
If our inner ear is damaged (infection, age-related changes, tumours), we could have a balance deficit. Then, because the brain is the all-powerful coordinator, changes in brain structure (i.e. stroke, Parkinson’s disease, age-related changes), could also lead to balance deficits!
OK enough explaining, let’s get to the fun stuff!
Balance Testing
There are plenty of tests that measure some various types of balance, both statically (staying still), and dynamically (while moving). This section will outline a few that are easy to test on your own. It’s always good to write down your initial scores, so that you can practice to improve, and re-test.
CAUTION: If you are at risk of losing your balance, falling, or otherwise injuring yourself, DO NOT try ANY of these tests without proper supervision.
Static Balance Tests:
1. Single Leg Stance Test:
- Standing. Lift one leg off the ground and balance on 1 foot. Hold this as long as possible. If you have to touch something with your hands, or put your foot down, then the test is completed.
The average single leg stance time across all ages is 33.4 seconds. (To check out the study, click here! It will also help with age-specific ranges.)

2. Single Leg Stance Test (Eyes Closed)
- This test is performed the same way as above, just with your eyes closed!
- The average eye-closed single-leg stance time is 8 seconds across all ages (it’s amazing how much vision helps, isn’t it!)
I stood on something to make it even harder here:
3. Tandem Stance
- Place one foot in front of the other so that the heel of one foot is touching the toes of the opposite foot. Hold this as long as possible. If you have to touch something with your hands, or step with either foot, then the test is completed.
- Aim for the ability to hold this position for 30 seconds.
All static balance tests can be changed/modified to impose different challenges.
- Standing on a piece of foam, or a pillow will alter input from your proprioception system.
- Closing your eyes eliminates input from your vision system
- Looking up will alter input from your vestibular system
Therefore, to make a static test really hard, stand on foam, close your eyes, and look at the ceiling. All are appropriate challenges providing your initial testing and re-test are done under the same conditions. Remember: BE SAFE!
Dynamic Balance Tests:
1. Y- balance test
- This really is a true dynamic balance test, which is why it made the list. That said, ‘perfectly accurate’ scoring requires equipment that no one really owns. That said, using a partner, you could still get a pretty good idea of your abilities, and work to improve.
- On the actual Y balance test, you stand on 1 leg on a centre block, and push another block along the ground as far as you can with your opposite foot. You push straight forwards, and on both backward 45 degree angles. (3 directions total). Then, do 3 reps per leg in each direction. Take the average of each direction (for each leg), then compare leg to leg.
- Without the fancy Y balance equipment board, you can simply tape a ‘Y’ on the ground (ensure 45 degree angles for the ‘top’ of the ‘Y’). Have a friend mark on the tape how far you can reach, then average your scores as outlined above.
- When comparing leg to leg, if you have a greater than 4 cm difference in your forward reach distance average, you may be at risk for injury. A greater than 6 cm reach distance is used as the cut off for the backward angle reach distances.
2. Alternate stepping test
- This test is quick and easy, requiring only a step and stopwatch. It will be easy for young, healthy individuals, but will pose a challenge for those who have sustained injuries, or some elderly individuals.
- Stand in front of a step and place each foot alternately on the step. Continue until each foot has touched the step four times. Time how long this takes to do.
- A ‘perfect’ score is all 8 steps in 20 seconds or less, without losing your balance (touching something for support, having someone else support you). That said, time yourself, and see how much faster you can get after practicing your balance!
3. Timed up and Go
- I chose to go over this test because it helps determine who may be at risk of falling (and, in many cases, falling=injury; so let’s not fall, deal?). Again, it will be easy for young, healthy individuals, but will pose a challenge for those who have sustained injuries, or some elderly individuals.
- You need an armchair, a stopwatch, and a piece of tape or marker on the floor 3 metres (10 feet) directly in front of the chair.
On the word “go”, a stopwatch is started. The participant then needs to stand up, walk the 3 metres, turn around, walk back, and sit back down. (The CDC has an excellent scoring sheet )
Scoring 14 seconds or longer indicates a high risk for falling (Shumway-Cook A, Brauer S, Woollacott M. Predicting the probability for falls in community-dwelling older adults using the timed up & go test. Phys Ther. 2000;80(9):896-903.)
- This is an example of a test that many may consider not a true “dynamic balance test”, but in my opinion, many struggle to balance in the transition period of sit to stand, and stand to sit, while also with walking and turning. This test covers all of that, so really, it’s an all-encompassing test!

4. If you’re suspected to have a balance deficit, a good test that covers both static and dynamic balance is called the Berg Balance Scale. It has 14 different balance items (some of which I suggested above), and will take a little longer to complete. It will be easy for young, healthy individuals, but is an excellent measure of overall balance in older individuals, or individuals with balance deficits. Here’s a PDF of the test.
The test is scored out of 56 total points. A score of < 45 indicates individuals may be at greater risk of falling. (You can read the study here)
- As with any testing, it’s important to write down your scores (then try and forget them). Practice improving your balance (see below!) for 4-6 weeks, then reassess your scores (and write them down) to see if you improved.
Balance Progression Program Using Static & Dynamic Exercises
Here’s some good news: many of the above testing can be used as the training program, so not a lot of new to learn. As with any exercise-based program, it’s important to slowly, and progressively ramp up the difficulty level. SLOWLY and PROGRESSIVELY. That said, I will outline a balance progression program using static and dynamic exercises for both beginners, and advanced… read on! If you have a balance deficit, please use supervision, or stand near something sturdy (like the kitchen counter), where you could grab hold if you were at risk of falling.
Beginner Program:
Note: these are a good starting point of static balance exercises for the elderly (or those with a balance deficit).
Exercise #1: Single leg balance
- Stand on one leg with your knee very slightly bent.
- Hold for 30 seconds. Repeat 3 times. Do 1-2x/day. If you lose your balance before 30 seconds, simply get back on 1 leg and continue your count (don’t restart your count).
- Progression 1: Stand on one leg on a piece of foam or a pillow OR stand on one leg with your eyes closed. Reps and times as above.
- Progression 2: Stand on one leg, on a piece of foam/pillow, with your eyes closed. Reps and times as above (which will be quite hard!)
Exercise # 2: Tandem Stance
- Stand with one foot directly in front of your other foot, heels of one foot touching the toes of the other foot. Hold for 30 seconds. Repeat 3 times. Do 1-2x/day.
- Progression(s): as above, stand on foam/pillow, close your eyes, or both!
- Dynamic progression: Walk heel-toe (like you’re on a tightrope), without other support. Aim to walk 10-20 feet, take a rest, then repeat 3 times. To make this really hard, you could do it with your eyes closed or while looking up!
- Note: advancements could also be done by increasing how long you hold the balance for, or how many repetitions you do!
Advanced Program:
Many advanced balance exercises require additional equipment (like balance boards, or Bosu balls), so some of this program will show these progressions. Most gyms have this equipment. This is a good starting point for a balance training program for younger individuals and athletes.
Exercise #1: Rocker-board Balance
- Stand on a rocker-board and try to maintain your balance. Complete with the board rocking forwards and backward, as well as with it rocking side to side.
- Hold for 30 seconds. Repeat 3 times. Do 1-2x/day. If you lose your balance before 30 seconds, simply get back on the board and continue your count (don’t restart your count).
- Progression #1: Try to squat up and down slowly while maintaining your balance. Try to complete 5-10 squats. Need it harder again, you say!? Hold some weight in your hands.
- Progression #2: Balance on a wobble board instead of a rocker-board. This thing has only a single central fulcrum. Way harder!
Exercise #2: Y Balance
- As per the Y balance test above… simply practice the test.
- Try to reach forward, then backward-outwards, then backward-inwards as far as possible without losing your balance or touching your moving foot to the ground. Try to complete 3-5 full repetitions before you put your foot down.
- Progression: Stand on a piece of foam or bosu ball and try again!
Exercise #3: Pick it up, then put it down (all on 1 leg!)
- Stand on one leg with 3 small items in your hands. Try setting them all somewhere on the floor, then pick them all back up. This exercise can be highly variable, and forever changing. Feel free to limit yourself to one hand, set items on the ground, or on other things, and then try it again while standing on an unstable object – the options are unlimited!
Exercise #4: Hop, skip, and jump
- Again, the opportunities are endless here. Focus on the perfect landing from various jumps, hops, and skips. Go side to side, forward and backward, but ensure you land PERFECTLY. Most of the challenge here comes with landings on a single leg, so make that the focus (if it’s safe for you). We’ve made some gifs of your options, below.
- Remember, start easier and progress to harder. Start slow and progress to faster. Focus on excellent landing and control while maintaining your balance.
Exercise #5: Challenge all systems
- Stand on an unstable surface (on one foot, or in tandem stance). Close your eyes. Look up. Try to hold this. Your proprioceptive system is challenged (by the unstable surface), your vision system is removed (by closing your eyes), and your vestibular system is challenged (by tipping your head fully backward). Check out this “example” (IT’S HARD, OKAY!?)
Although maintaining balance may seem like a leisurely, simple thing during everyday tasks, it involves a complex neuro-sensorimotor intercommunication (try saying that 10x fast) of many body systems. Ensuring you are able to maintain good balance will help prevent falls (possible injuries), while also enhancing your athletic abilities. If you’re over the age of 50, or if you’ve experienced a reduction in your balance, it’s probably worthwhile to start practicing your balance on a daily basis. Start with the beginner balance progressions above and progress as you (SAFELY) can. If you need some guidance or support, enlist the help of a physiotherapist in Kitchener.
At Strive Physiotherapy and Performance, we are committed to providing an in-depth assessment to ensure we can work together to find the best plan of action for each individual client. Call us at 519-895-2020, or use our online booking tool on www.strivept.ca to book an appointment with one of our knowledgeable physiotherapists, and they will be sure to help you understand your balance!
Take care,
Tyler Allen
Physiotherapist at Strive Physiotherapy & Performance
Keywords: “Balance progression program using static & dynamic exercises”,
Static balance exercises for elderly, Dynamic balance exercises for stroke,
Balance exercise examples, Balance training program for athletes,
Balance exercises physiotherapy, Dynamic lower body,
Balance disorder exercises, Parkinson, Plank, Older adults, Nasm
Sitting, Hemodialysis, Systematic, Bosu, Stability, ACL, Standing, Training
Vestibular and balance rehabilitation